Wednesday, June 29, 2011

The Daring Bakers challenged us to make homemade baklava!


Wow this month we had an awesome challenge!!! Baklava is one of my guilty pleasures lol it's honey sweet goodness is so strong it takes me about an hour to eat one piece lol.
I remember as a kid going over to my friends house (she was from Morocco Africa) and her mother would make similar treats to baklava using a lot of honey/syrup and cardamon and nuts. She would be careful to serve me first with her best dishes, fresh mint tea in those beautiful little tea glasses. She would be adamant that I eat all I could. I learned NEVER EVER to say "no,thank you", I remember saying no thank you politely and feeling my friend poke my side and say that I must eat it or her mother would be hurt (her mother only spoke Arabic)i remember her talking up a storm and waving her hands at me lol.I found that honey and sugar in their culture was only really used in treats to serve their guests or for feasting (Ramadan in their case) because it was a symbol of wealth. I remember having to eat two full pieces of this honey goodness and praying I wouldn't get a toothache let alone a headache by the days end of the day ;-). (Please know that these memories are all based on my friends home and their ways of life, I am in no way knowledgeable in their culture in any way but love learning about it ;-)...)
I started to really love baklava after I went to a partly Greek wedding ;-) My friend was from Greek background and her husband was Belgian. The wedding was absolutely lovely and she had ordered baklava and other Greek treats to be served.
I found that you could make your own baklava quite easily by "cheating" and buying the frozen dough in the store. it's really not that hard with the pre-bought dough ;-)make the sauce and nuts and follow the instructions really...
BUT 
that was not the case with this challenge lol I was super excited to try this out and I have made quite a few doughs before and was reasonable confident that this would be a success lol yeah...no...my conclusion is that if I had some great Greek relatives I might feel "guilted" into making it but I don't so store bought it will be just fine for my lazy self from now on ;-) But I am very very glad I tried and did learn how to attempt to make it lol

Here was our Daring Baker challenge this month:
Erica of Erica’s Edibles was our host for the Daring Baker’s June challenge. Erica challenged us to be truly DARING by making homemade phyllo dough and then to use that homemade dough to make Baklava.

Here was my journey to delicious baklava: 
Directions ready to use...
Mixed the oil vinegar and water

Mixer doing his job
Pouring in the last of the vinegar mix
Nice smooth dough
Not so smooth hands ;-)
Beautiful dough ball
Getting ready to put oil on the dough
After applying the oil, covering it up with plastic wrap
Only I would find beauty in dirty dishes ;-)
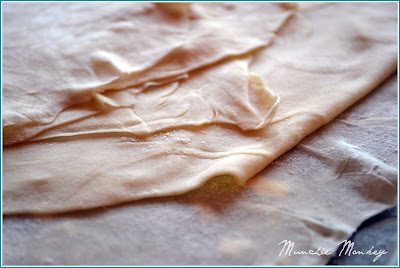
My first batch of phyllo dough not the prettiest or thinnest lol
The finished product...finally...it was sooo good!

Phyllo Dough:

Ingredients

  • 1 1/3 cups (320 ml) (185 gm/6½ oz) unbleached all purpose (plain) flour
  • 1/8 teaspoon (2/3 ml) (¾ gm) salt
  • 1/2 cup less 1 tablespoon (105 ml) water, plus more if needed
  • 2 tablespoons (30 ml) vegetable oil, plus additional for coating the dough
  • 1/2 teaspoon (2½ ml) cider vinegar, (could substitute white wine vinegar or red wine vinegar, but could affect the taste)
Directions
  1. In the bowl of your stand mixer combine flour and salt
  2. Mix with paddle attachment
  3. Combine water, oil and vinegar in a small bowl.
  4. Add water & oil mixture with mixer on low speed, mix until you get a soft dough, if it appears dry add a little more water (I had to add a tablespoon more) 
  5. Change to the dough hook and let knead approximately 10 minutes. You will end up with beautiful smooth dough. If you are kneading by hand, knead approx. 20 minutes.
  6. Remove the dough from mixer and continue to knead for 2 more minutes. Pick up the dough and through it down hard on the counter a few times during the kneading process.
  7. Shape the dough into a ball and lightly cover with oil
  8. Wrap tightly in plastic wrap and let rest 30-90 minutes, longer is best ( I let mine rest 2 hours and it was perfect)
  9. Remove all rings and jewelry so it does not snag the dough 
  10. Use whatever means you have to get the dough as thin as you can.  You may also use a pasta machine if you have one, or a normal rolling pin whatever works for you.
  11. Unwrap your dough and cut off a chunk slightly larger then a golf ball. While you are rolling be sure to keep the other dough covered so it doesn’t dry out.
  12. Be sure to flour your hands, rolling pin and counter. As you roll you will need to keep adding, don’t worry, you can’t over-flour.
  13. Roll out the dough a bit to flatten it out.
  14. Wrap the dough around your rolling pin/dowel
  15. Roll back and forth quickly with the dough remaining on the dowel
  16. Remove; notice how much bigger it is!
  17. Rotate and repeat until it is as thin as you can it. Don’t worry if you get rips in the dough, as long as you have one perfect one for the top you will never notice.
  18. When you get it as thin as you can with the rolling pin, carefully pick it up with well floured hands and stretch it on the backs of your hands as you would a pizza dough, just helps make it that much thinner. Roll out your dough until it is transparent. NOTE: you will not get it as thin as the frozen phyllo dough you purchase at the store, it is made by machine
  19. Set aside on a well-floured surface. Repeat the process until your dough is used up. Between each sheet again flower well. You will not need to cover your dough with a wet cloth, as you do with boxed dough, it is moist enough that it will not try out. 
Baklava Sauce


Ingredients:
  • 1 1/4 cups (300 ml) honey
  • 1 1/4 cups (300ml) water
  • 1 1/4 cups (300 ml) (280 gm/10 oz) sugar
  • 1 cinnamon stick
  • 1 (2-inch/50 mm) piece fresh citrus peel (lemon or orange work best, I used orange)
  •   A few cloves or a pinch or ground clove
Directions
  1.  Combine all ingredients in a medium pot over medium high heat. Stir occasionally until sugar has dissolved
  2. Boil for 10 minutes, stir occasionally.
  3. Once boiled for 10 minutes remove from heat and strain cinnamon stick and lemon, allow to cool as baklava cooks
Baklava Nut Filling

Ingredients:
  • 1 (5-inch/125 mm piece) cinnamon stick, broken into 2 to 3 pieces or 2 teaspoons (10 ml) (8 gm) ground cinnamon
  • 15 to 20 whole allspice berries ( I just used a few pinches)
  • 3/4 cup (180 ml) (170 gm/6 oz) blanched almonds
  • 3/4 cup (180 ml) (155 gm/5½ oz) raw or roasted walnuts
  • 3/4 cup (180 ml) (140 gm/5 oz) raw or roasted pistachios
  • 2/3 cup (160 ml) (150 gm/ 5 1/3 oz) sugar
  • phyllo dough (see recipe above)
  • 1 cup (2 sticks) (240 ml) (225g/8 oz) melted butter
Directions
  1. Preheat oven to moderate 350°F/180°C/gas mark 4.
  2. Combine nuts, sugar and spices in a food processor and pulse on high until finely chopped. If you do not have a food processor chop with a sharp knife as fine as you can. Set aside
  3. Trim your phyllo sheets to fit in your pan 
  4. Brush bottom of pan with butter and place first phyllo sheet
  5. Brush the first phyllo sheet with butter and repeat approximately 5 times ending with butter. (Most recipes say more, but homemade phyllo is thicker so it's not needed)
  6. Sprinkle 1/3 of the nut mixture on top
  7. Continue layering phyllo and buttering repeating 4 times
  8. Sprinkle 1/3 of the nut mixture on top
  9. Continue layering phyllo and buttering repeating 4 times
  10. Sprinkle 1/3 of the nut mixture on top
  11. Continue layering and buttering phyllo 5 more times. On the top layer, make sure you have a piece of phyllo with no holes if possible, just looks better.
  12. Once you have applied the top layer tuck in all the edges to give a nice appearance. 
  13. With a Sharp knife cut your baklava in desired shapes and number of pieces. If you can't cut all the ways through don’t worry you will cut again later. A 9x9 pan cuts nicely into 30 pieces. Then brush with a generous layer of butter making sure to cover every area and edge
  14. Bake for approximately 30 minutes; remove from oven and cut again this time all the way through. Continue baking for another 30 minutes. (Oven temperatures will vary, you are looking for the top to be a golden brown, take close watch yours may need more or less time in the oven)
  15. When baklava is cooked remove from oven and pour the cooled (will still be warmish) syrup evenly over the top, taking care to cover all surfaces when pouring. It looks like it is a lot but over night the syrup will soak into the baklava creating a beautifully sweet and wonderfully textured baklava!
  16. Next morning all syrup is absorbed
  17. Allow to cool to room temperature. Once cooled cover and store at room temperature. Allow the baklava to sit overnight to absorb the syrup
  18. Serve at room temperature 
Freezing/Storage Instructions/Tips: There are a few ways to store your Baklava. It is recommended that you store your baklava at room temperature in an airtight container. Stored at room temperature your baklava will last for up to 2 weeks. You will notice as the days pass it will get a little juicier and chewier. You may choose to store it in the fridge; this will make it a little harder and chewy, but does increase the shelf life. You can also freeze your baklava and then just set it out at room temperature to thaw.
    Adapted from Alton Brown, The Food Network

    Saturday, June 25, 2011

    I'm Back, with scrumptious Piña Colada Cupcakes !!!!!

    What a week!!!, the internet went out, along with that went our netflix, the TV decided it didn't want to play dvd's at all and my phone started to act up...grrrrrr great!
    Now you need to understand that I live on a 102 acres in the middle of nowhere and the closest store is 40min away and I have 2 little ones under 2.5yrs...so yeah it was a rough week.
    Anywho things are back up and running and I am excited as ever to share whats going on here on Munchie Monkey.
    I must apologize for the photography in advance, my camera is in the shop after my 2 year old found it and started to fiddle with it (thank God for extended warranties and insurance policies lol) so all the pictures are taken by my droid. I really do hope you all had an awesome fathers day and are planning to have an incredible and safe 4th of July!!!

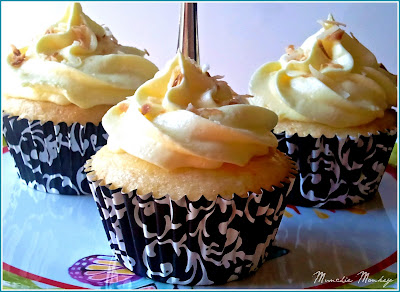
    Piña Colada Cupcakes with pineapple butter-cream frosting

    Today I decided to make some treats for my hubby's work colleagues and for the BBQ I was attending later that afternoon. Since it was friday and people are dying to get home and start their deserved and longed for weekend I decided on Pina Colada Cupcakes with Pineapple Butter-Cream frosting...mmmmmm so good!!! I love the smell of the cupcakes as they were gently tanning golden brown in the oven, the smell of pineapple and coconut...Oh My Word weekend here we come! the cupcakes came out looking beautiful and were so light and airy and smelled divine!
    I confess I am not a frosting lover and I'm not the best at making frosting and we have had a love hate relationship when it comes to making and frosting a cake...I lack the patience and it lacks forgiveness and grace... and honestly I would have loved a whipped cream with pineapple combo for the frosting far better (I will try that next) but sadly I did not have enough whipped cream in the house at the time...sooo pineapple butter-cream seemed to be a good replacement. Everyone loved them hope you do too!!!


    Piña Colada Cupcakes
    Printable Version

    Ingredients: 
    • 1 box white cake mix
      (yes, I cheated I have two little ones at home and little time! No one could tell! ;-)...)
    • 1 cup pineapple juice
    • 1/3 cup coconut rum
    • eggs (according to package)
    • vegetable oil (according to package)
    • 8 oz. can crushed pineapple in juice, drained well
    • 1/2 cup shredded, sweetened coconut

      Directions:
    1. Add mix, eggs, and oil according to the package. 
    2. Substitute water for 1 cup pineapple juice and 1/3 cup coconut rum. Blend well with electric mixer.
    3. Add pineapple. Make sure it was well-drained and mix until just blended. 
    4. Fold in coconut . 
    5. Bake according to the package instructions.

    Pineapple butter cream frosting
    Printable Version

    Ingredients:
    • 2 stick butter
    • 6 cups powdered sugar
    • 4 tbsp Pineapple puree or juice
    • Juice of 1/2 lemon 
    • 1/2 cup sweetened toasted coconut
    Directions:

    1. Beat the butter and powdered sugar together in the bowl of a stand mixer. 
    2. Add the pineapple about a teaspoon at a time until the icing has a smooth, creamy consistency. 
    3. Beat in the lemon. (If consistency is too runny add more sugar, if too thick add more pineapple juice)
    4. Transfer the frosting to a piping bag, and pipe onto the cupcakes. 
    5. Sprinkle with toasted coconut.
     

    Thursday, June 16, 2011

    Daring Cooks: Tzatziki Potato Salad

    Jami Sorrento was our June Daring Cooks hostess and she chose to challenge us to celebrate the humble spud by making a delicious and healthy potato salad.
    The Daring Cooks Potato Salad Challenge was sponsored by the nice people at the United States Potato Board, who awarded prizes to the top 3 most creative and healthy potato salads. A medium-size (5.3 ounce) potato has 110 calories, no fat, no cholesterol, no sodium and includes nearly half your daily value of vitamin C and has more potassium than a banana!


    I Loved this challenge, any challenge that really does put my mind to work is awesome!
    Well I am a firm lover of the original spud salad lol and am not to keen on the "healthy" versions I had tried so far (I know, I know they are better for the figure). After looking up healthy versions of potato salad I came across a few with yogurt. Yogurt didn't sound too bad and I use it often when I make curry so first I thought of a curry potato salad but alas I had no curry in my possession at the time and I was on a strict budget and had told myself to only use up what I had in the fridge and cupboards...sigh...I sometimes wish I was more adventurous and talented at combining different flavors and coming up with awesome recipes but I'm sadly not the best ;-) so when they said we had full reign with this one, my mind went everywhere lol
    I finally settled on this tzatziki potato salad from Food&Wine. I love tzatziki sauce and I use it with a lot of my Greek and Iranian recipes. sooooo good
    Here is some info on Tzatziki sauce:

    Tzatziki is a Greek meze or appetizer, also used as a sauce. Tzatziki is made of strained yoghurt (usually from sheep or goat milk) mixed with cucumbers, garlic, salt, usually olive oil, pepper, dill, sometimes lemon juice and parsley, and sometimes mint added. Tzatziki is served cold.
    While in Greece and Turkey the dish is usually served as an accompaniment, in other places tzatziki is often served with bread (loaf or pita) as part of the first course of a meal.

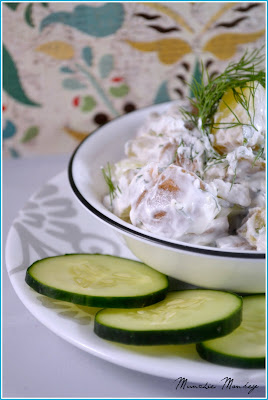
    I ended up using organic Greek yogurt,fresh dill and mint leaves, I didn't have kirby cucumbers in the refrigerator but did have a regular cucumber...it worked great! I used Yukon petite potatoes and left the skin on (it keeps the nutrients in the potatoes ;-)...)
    I added some crumbled goats cheese and would have added a little bit smoked salmon if I had it, but that is totally up to you ;-)


    Hope you like it!

    Tzatziki Potato Salad
    Printable version

    Ingredients
    • 2 1/2 pounds Yukon Gold potatoes, peeled and cut into 3/4-inch cubes
    • 3/4 cup Greek-style, plain fat-free yogurt
    • 1/4 cup light mayonnaise
    • 3 Kirby cucumbers—peeled, seeded and cut into 1/2-inch cubes (I used a regular cucumber)
    • 1 serrano chile, seeded and thinly sliced
    • 1/4 cup coarsely chopped fresh mint
    • 1 tablespoon chopped fresh dill
    • Salt and freshly ground pepper
    • 1/4 cup crumbled goats cheese (optional)
    • smoked salmon to taste (optional)
    Directions
    1. Bring a large saucepan of salted water to a boil. Add the potatoes and cook over high heat until tender, about 9 minutes. Drain, gently shaking out the excess water. Spread the potatoes on a baking sheet in a single layer and freeze for about 10 minutes, just until no longer warm. 
    2. Meanwhile, in a large bowl, whisk the yogurt with the mayonnaise until smooth. Add the cucumbers, chile, mint and dill, cheese. Fold in the potatoes, season with salt and pepper add smoked salmon and serve.
    Make Ahead The potato salad can be refrigerated for 2 days.

    Recipe adapted from Food&Wine

    Wednesday, June 15, 2011

    I'm in love with this Cilantro Pesto!!!

    Ok so I admit I have a love affair with pesto sauces especially home-made ones!
    I usually wait for a good price on a big bunch of fresh basil leaves and for publix to have their olive oil on BOGO (I love BOGO!!!) to make pesto. My husband is not to keen on it so I don't get to make it very often. But today I had some left over cilantro to use up. I had already frozen what I could and had a small bushel left that desperately needed to be used up. I LOVE cilantro and don't want to waste any if I can help it. As I was looking through my old summer (I sort them by date)magazines I noticed a page on pesto..."ping" (that's the sound of the light bulb going on in my brain) I don't know why I never thought of this before...making pesto out of cilantro...wow super excited now! and OH MY WORD this pesto is to die for! I am sooo in love ;-)

    If you are a cilantro fan and have never tasted cilantro pesto you are in for a treat! I used walnuts and pine nuts because I love the flavor of those, but you can use whatever nut you have in abundance in your cupboard This recipe would make a great dip if added on top of softened cream cheese, or if added to pasta, mashed potatoes or even as a sandwich spread (I'm thinking grilled chicken pesto pita's mmmm)
    here is the recipe and definitely try it if you like pesto!

    Cilantro Pesto 

    Ingredients
    • 5oz  fresh cilantro (about 4cups packed)
    • 2/3 cup olive oil
    • 1/3 cup pine nuts
    • 1/3 cup chopped walnuts
    • 4 cloves roughly chopped garlic
    • 2/3 cup grated Parmesan cheese
    • Salt & Pepper to taste
    Directions
    1. Rinse the cilantro. Roughly chop the cilantro into big sections. Put the cilantro, oil, garlic and nuts in a blender or food processor.
    2. Blend until smooth. This will require turning off the blender a few times to smush things down. 
    3. Pour into separate bowl and mix with cheese, add salt and pepper.Taste and adjust seasonings. 
    I use this pesto stirred into pasta, on pizza, and over fish and chicken. Mix some into cream cheese for a dip with crackers or just eat it with a spoon. Delicious. It freezes very well, too. There will be some oxidation on the top surface but it won’t hurt anything-just stir it in when you are ready to use it. If it bothers you, pour a thin layer of oil over the top before storing the pesto.

    Enjoy!
     

    Sunday, June 12, 2011

    Easy Peasy Tres Leches Cake!!!


    I have never really liked the idea of tres leches cake, maybe it's the name...I don't know  ;-) But ever since a friend of mine brought over a huge piece of her scrumptious tres leches cake (thank you Ange!), I must admit I have been hooked ever since.
    I wanted a quick version of this dessert since I didn't think I could handle the 12 eggs version.
    And with kids it can be hard to find the time ;-) (though I am intrigued, and might try it sometime).
    This recipe is amazing and was so good! the only thing I would change is using the Betty Crocker extra moist vanilla cake (I used the Duncan Hines and thought it was a tad dry).
    Here is the recipe hope you like it!

    Easy Peasy Tres Leches Cake
    Printable version

    Ingredients

    1 box  Super Moist yellow cake mix(the ones with the pudding)
    1 1/4 cups water
    1 tablespoon vegetable oil
    2 teaspoons vanilla
    4 eggs
    1 can (14 oz) sweetened condensed milk (not evaporated)
    1 cup whole milk or evaporated milk (sometimes I use coconut milk)
    1 cup whipping cream
    1 container cool whip

     1       Box strawberries

    Directions
    1. Heat oven to 350°F (325°F for dark or nonstick pan). Grease and flour or spray bottom and sides of 13x9-inch pan.
    2. In large bowl, beat cake mix, water, oil, vanilla and eggs with electric mixer on low speed 30 seconds, then on medium speed 2 minutes, scraping bowl occasionally. Pour into pan.
    3. Bake 29 to 35 minutes or until edges are golden brown and toothpick inserted in center comes out clean. Let stand 5 minutes. Poke top of hot cake every 1/2 inch with long-tined fork, wiping fork occasionally to reduce sticking.
    4. In large bowl, stir together sweetened condensed milk, whole milk and whipping cream. Carefully pour evenly over top of cake. Cover; refrigerate about 1 hour or until mixture is absorbed into cake. Frost with cool whip and top with fresh sliced strawberries.
    Makes 15 servings
    Recipe adapted from Betty Crocker 

    Here are some cool varieties: I sometimes use coconut milk instead of the evaporated milk , then top the cool whip with toasted coconut ;-) 


    Tuesday, June 7, 2011

    Cake pops oh cake pops why can't you be healthy???

    Red velvet/cream cheese cake pop with pink butter cream icing
    Have y'all been to Starbucks yet and tried their cake pops? I'm not overly intimidated by them and am convinced any seasoned cake pop maker would do better and do ;-)  But I say that the tiramisu flavored pop is amazing and I am going to find the closest version to it soon I MUST because it's haunting me lol
    anyways cake pops are too much fun not to make and sometimes just too cute to eat! I have seen some amazing cake pops online and am amazed at all the diversity and talent! I am by no means a seasoned or talented cake maker let alone cake pop maker but I do enjoy trying ;-) it's usually hit or miss with mine these where a hit! I used candy coating this time instead of pure white chocolate and bought it from walmart (trying to cut costs a bit) but I was not overly impressed by it's quality. The flavor was way too strong and the coating was too thick for my taste leaving you with far to much coating in proportion to the cake.I don't really like a lot of icing on a cake so I guess it's just preference ;-) There are tons of different flavors you can mix together when making cake pops, I have my three favorite flavor combos; German chocolate/coconut pecan, lemon/cream cheese and of course red velvet/cream cheese (pictured below, oh and of course the addicting tiramisu...mmmm...one day very soon I promise I will have the recipe!). The concept of cake pops is actually really simple and the recipe easier still but the execution is a little elusive and it takes patience and time!
    Some things I found useful when making these treats;
    1. Make sure your temperature in the kitchen is pretty stable no humidity.
    2. Coating your stick before sticking it into the cake ball helps.
    3. Space...lots of space...
    4. which goes with time...lots of time...
    5. Make sure the coating and the cake pops don't differ too much in temperature or the coating will crack after dipping.
    6. Have something ready to place the finished product in, I used a styrofoam block covered in foil.
    7. If your candy coating is too thick add some shortening or paramount crystals to the candy coating.
    You can find lots more info on these cute little treats at bakerella's site (she invented them and has the cutest collections and ideas ever! not to mention a great site, check it out!)
    Click here for a link to bakerella's promo video for her cake pop book, she shows and explains how to make the cake pops. And I will add the recipe for the pops i made below the pictures ;-)

    Saturday, June 4, 2011

    Impress your guests with these really easy pizzas and use leftovers to do it ;-)

    These pizzas are the bomb! I love them cause they are so easy to make! I was going through our fridge today since Justin was getting off early (Yipeeee happy dance!!!!) and I needed to get lunch ready. Something all of us would enjoy! Pizza sounded good, but I hate ordering it and paying a whopping $16 for it (on rare occasions I will order pizza usually when they have extreme discounts)  well looking through the fridge and it's the end of the week so things are kinda sparse but I found some BBQ chicken and potatoes that needed to be used. Hmmm my mind started thinking (it rarely has the time to do that) my hubby and I went out to lunch a couple of weeks ago with our kiddos, we ended up choosing this little cute colorful joint named "mellow mushroom" (yes it originated in the 70's lol) anyways their specialty was pizzas and not just any pizza! they made interesting and creative flavor combinations like my favorite the loaded baked potato pizza. I already had the potatoes to use up...I scanned my fridge for other ingredients i might need...yep got it...got it ...and yes I have pretty much everything for an awesome baked potato pizza ;-) but hold on my hubby is not to thrilled with pizzas that include "white sauce" ...I had some left over BBQ chicken and we always have tons of BBQ sauce in the house. So my choices were made. now the nice thing about all this is that my dough recipe is really easy and only takes 20min to make, no rising and punching...real simple and real quick and still has an amazing flavor!and seriously who can beat homemade pizza that is done in the same amount of time than if you ordered it, healthier too and definitely beats in the flavor department!
     So I thought I would share my recipes with you! hope you enjoy it as much as my husband did ;-)

    Loaded baked potato pizza

    I am mom...hear me roar!!!!

    The blues brothers ;-)

    OK so today was one of the hardest day's I've had in awhile. Have you ever felt like your life seemed to pass you by and all you seem to do is run around the house chasing little munchkins. Who seem to slip out of your hands and vision the second you put them back down...aaaaaaargh is the correct emotion I am feeling right now.
    I sometimes feel like I am failing miserably in about everything I do...ever felt that? know where I am going?
    well today I had a small breakthrough that will hopefully weaken some great walls I have surrounding me at this moment.